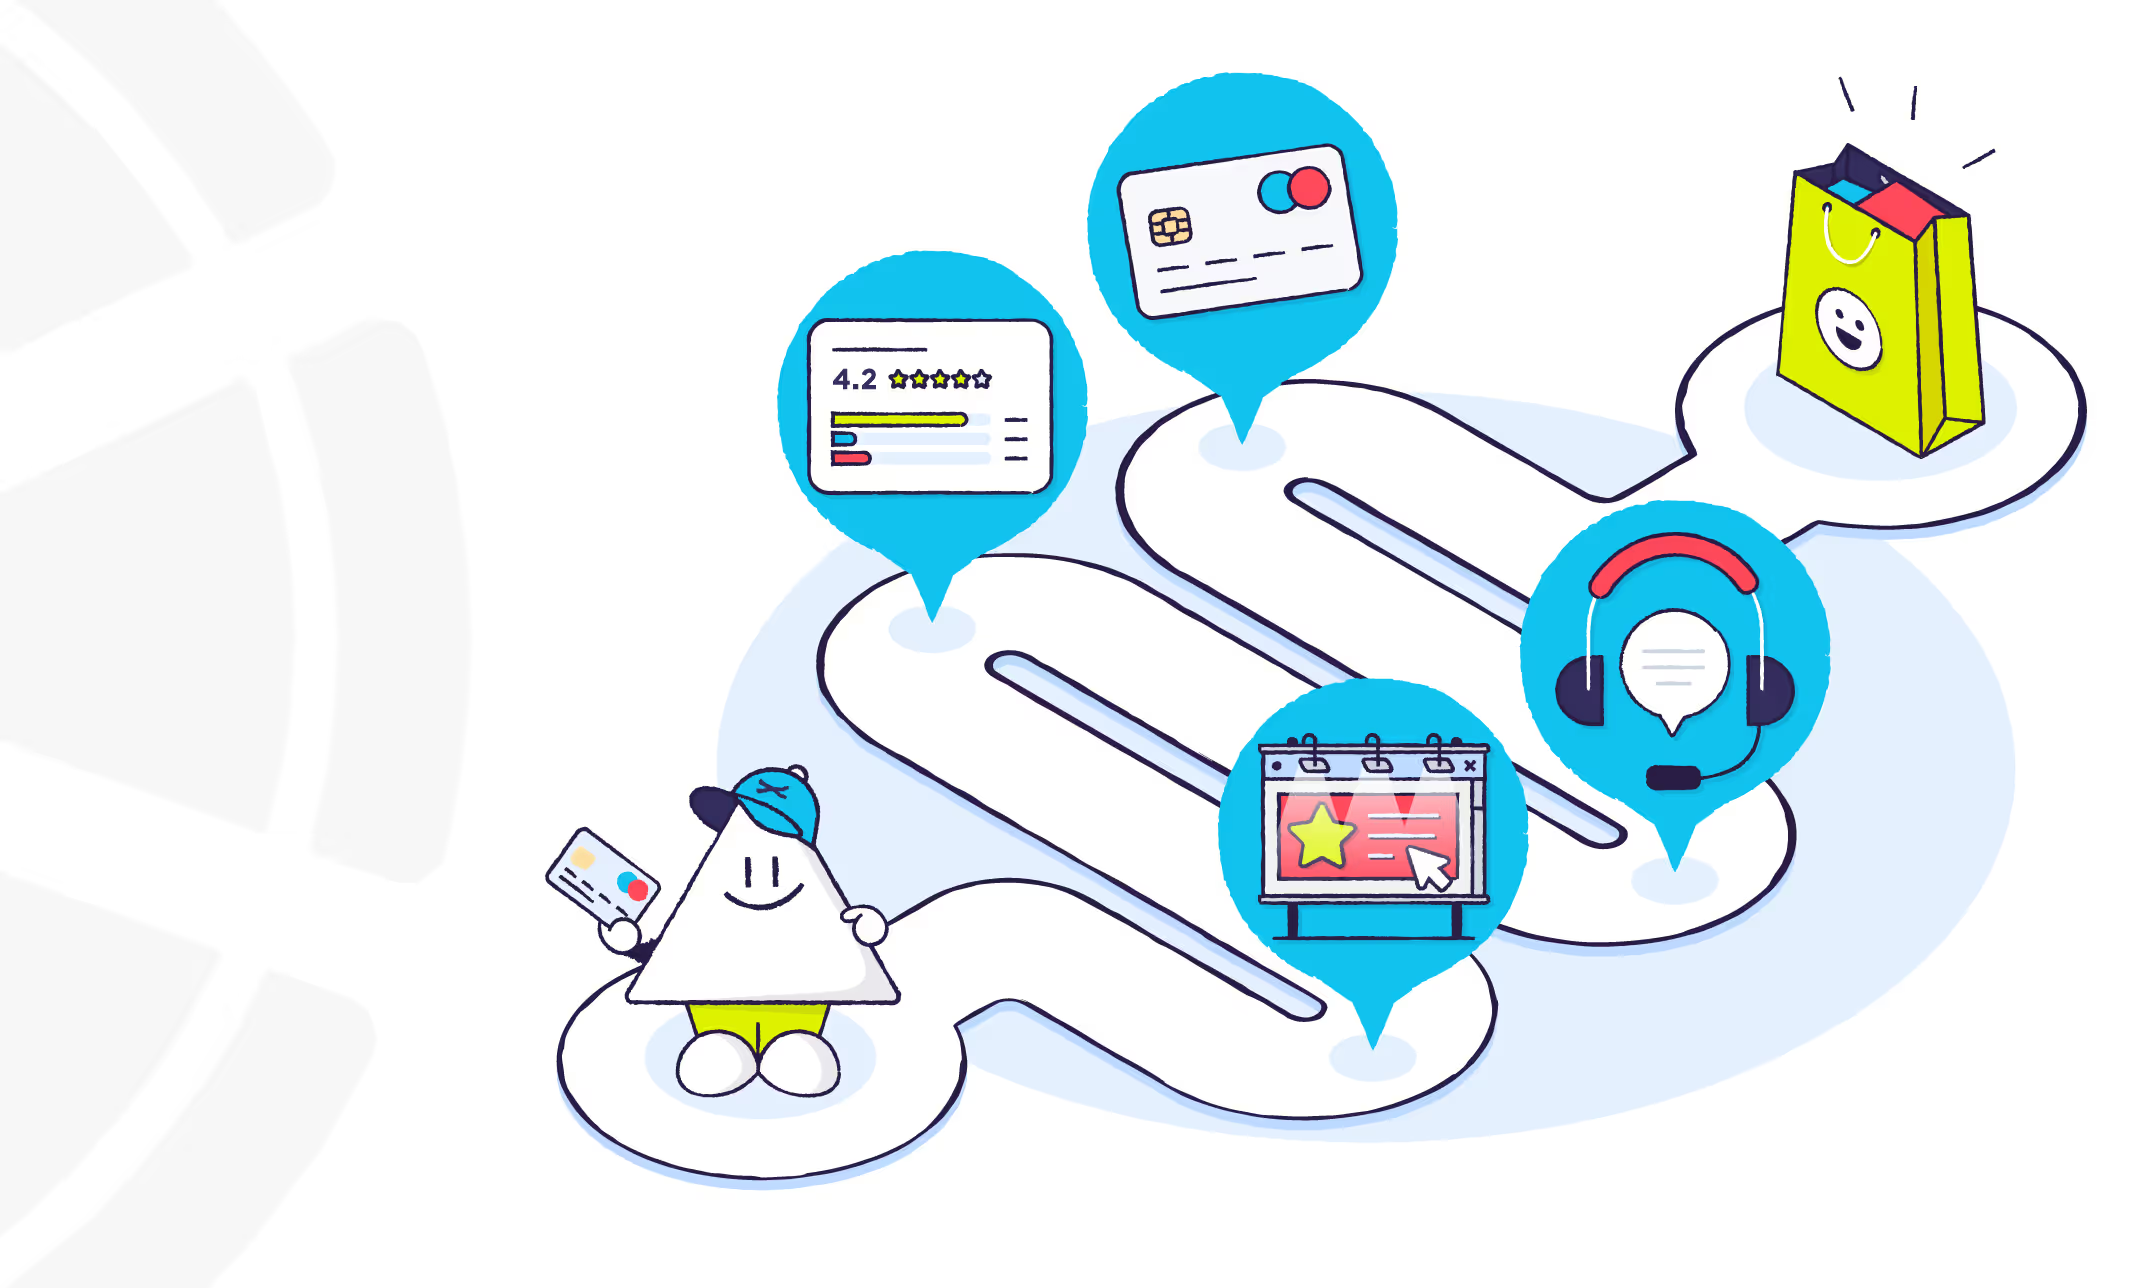
Using data gathered from feedback surveys, online reviews, and other customer satisfaction metrics, a customer journey map is used to tell the story of a customer’s lifetime relationship with a company. Depending on the customer persona, this relationship can be as short as a few minutes or as long as many years. Customer journey maps are useful tools for visualizing the quality of each interaction and the customer’s reaction to that touchpoint as they move up the brand equity pyramid.
You can download our customer journey map template, or continue reading to learn more about creating your own.
Table of Contents:
- Customer Journey Map: Understanding the Basics
- How to Create a Customer Journey Map in 7 Steps:
- Determine Target Personas
- Define Your Customer Touchpoints, Actions, and Reactions
- Break Out Touchpoints and Actions Into Phases
- Test the Customer Journey Map
- Complete the Customer Journey Map with Persona Data
- Identify Areas of Improvement
- Create a Corresponding “Business Actions” Map
- Customer Journey Map Examples
- Customer Journey Map Downloadable Template
Customer Journey Map: Understanding the Basics
Before we dive into creating your own customer journey map, it’s important to cover the basic ideas behind these types of visualizations and why they’re helpful for businesses.
How Journey Map Tracking Helps Businesses Understand Customers
As we briefly mentioned earlier, customer journey maps are tools that help you visualize the specific steps customers go through when interacting with your business. Using buyer personas (a semi-fictional representation of a type of customer based on market research and real customer data, as defined by Hubspot) you can track the path different customers take on the road to conversion and pinpoint failed or successful interactions. This ultimately helps you do things like:
- Allocate advertising budgets to channels that produce the most positive responses
- Collaborate across teams to improve touchpoints that continuously produce a negative reaction
- Retain and satisfy existing customers by improving previous customers’ churn points
What Are Customer “Touchpoints”?
Customer touchpoints are any interaction someone has with your brand. These could be awareness-based touchpoints, where a potential customer learns about your company for the first time through things like:
- Social media ads
- Print ads
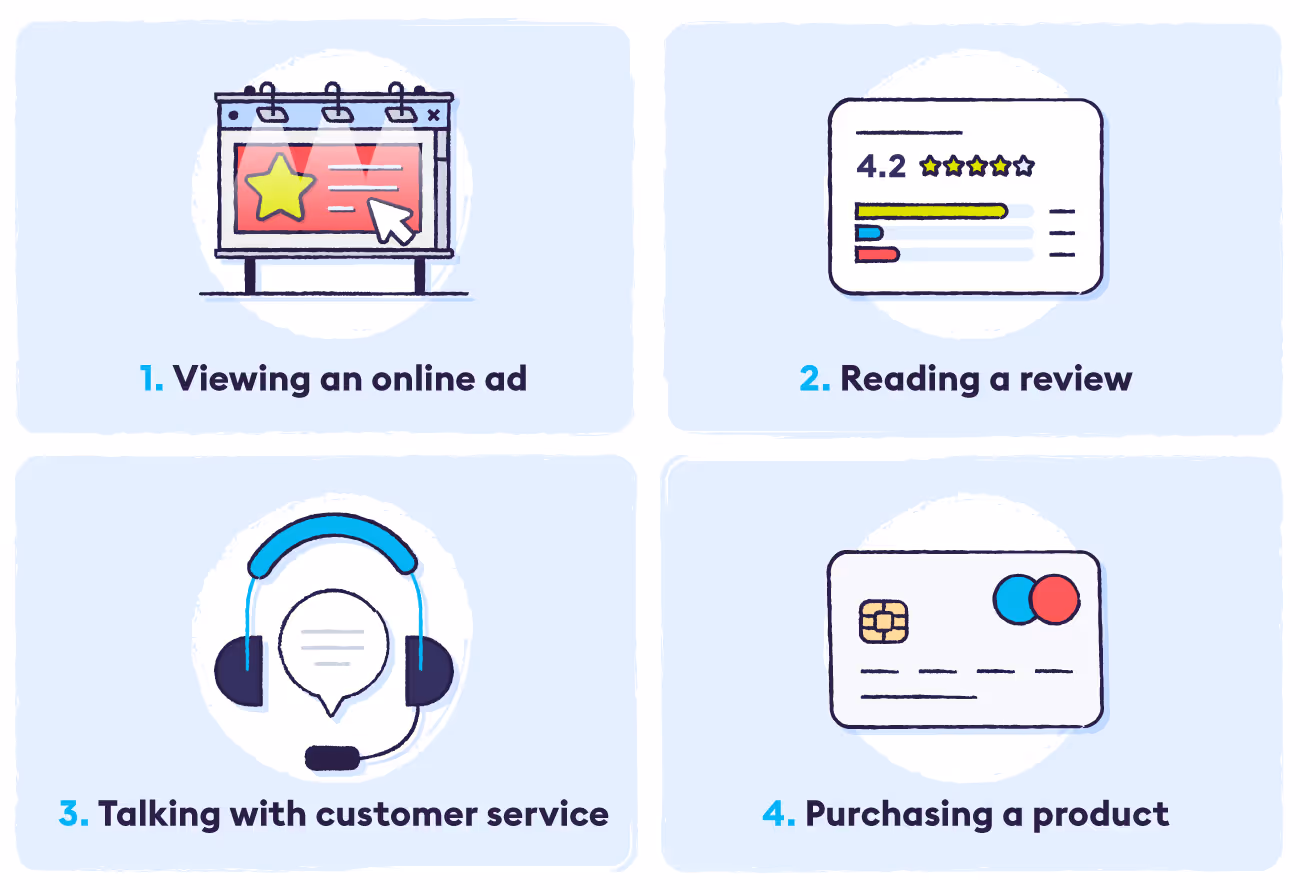
- Reading an online review
- Finding your site through organic search
Or, touchpoints can be more direct interactions such as:
- Clicking a product and reading the description
- Adding a product to their shopping cart
- Making a call to your customer service center
- Signing up for an email newsletter
Depending on the structure of your business, your customer journey map can cover just the main customer touchpoints on your buyer journey, or it can encompass any small interaction that can occur as well. Your ability to create a broad or detailed customer journey map will also depend on the customer data available to you.
How to Create a Customer Journey Map in 7 Steps
Though there are many customer journey map templates available online (including ours at the end of this article) it’s still good to understand the fundamental ideas behind how these maps are created so you can learn to customize each to suit your needs.
Step 1: Determine Target Personas

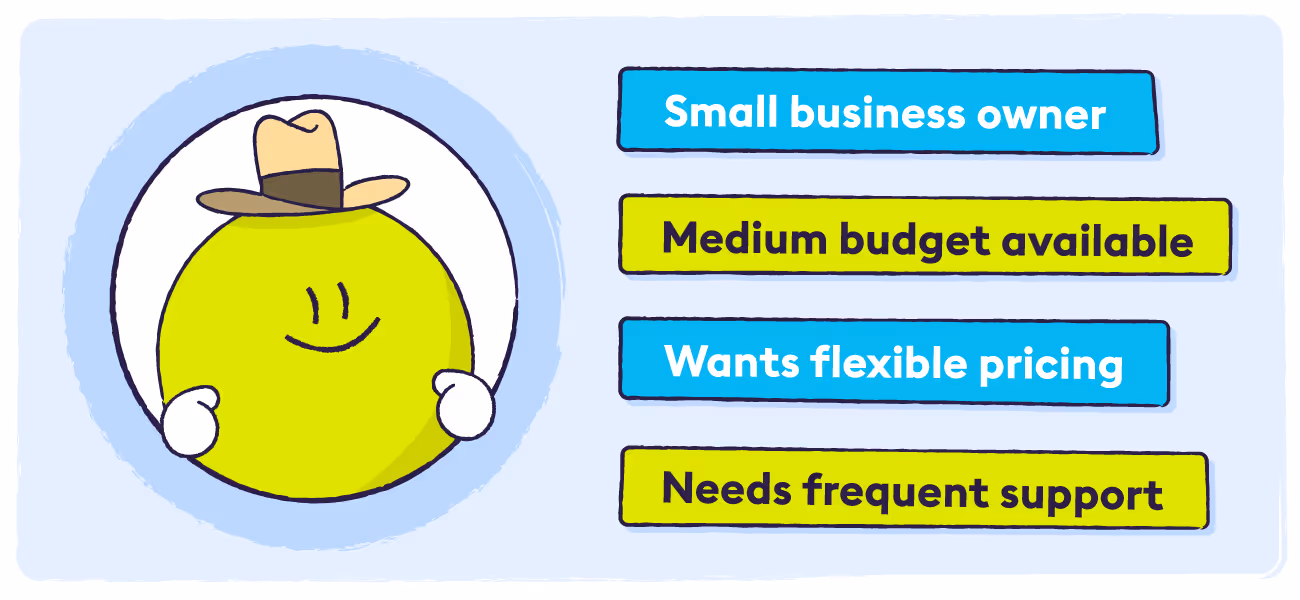
Each customer journey map is meant to demonstrate just one segment of your customer base, so it should be built specifically for each persona. Many businesses already have personas built for other purposes such as targeted ad campaigns, but if you haven’t, they aren’t too hard to construct. Utilizing your existing user data, create mock customers based on factors like:
- Demographic data (age, gender, location, etc.)
- How they first learned about your company
- Their budget
- What their goals are when purchasing from you
- What’s most important to them when buying
- Pain points that your company either does or could address
Then, decide which persona you’re going to target for this iteration of your customer journey map. For example, you could focus on the “tech-forward business executive” or the “Millennial startup owner,” whichever customer type you want to learn more about and improve the customer experience for.
Step 2: Define Your Customer Touchpoints, Actions, and Reactions
Once you’ve decided on your target persona, the next step is to define the customer touchpoints you want to track. As we talked about earlier, customer journey maps can be used to paint a broad picture of the buyer journey or track every little interaction possible. It’s up to you to determine what the most useful route will be for your project and where you want to focus your efforts.
It can be helpful at this step to list out every touchpoint you can think of, and then narrow down as needed. You’ll likely need to collaborate across teams to make sure you’re covering every type of customer interaction.
When you have your list of touchpoints compiled, it’s then easy to construct a corresponding list of customer actions. For example, if the touchpoint is “reads online review,” then the logical action would be “searches for company/product online.” After that, the next touchpoint would be “homepage/landing page” and the action would be “reads about product details.” You can see how building your customer journey map becomes easier once you get started.
In addition to touchpoints and actions, the third metric you will need to track in your journey map is customer reactions. These can be as basic as “positive and negative,” or be broken down further into numerical scales or other ratings. Customers take each action based on their reaction to the previous touchpoint. For example, a progression could look something like:
Touchpoint: targeted ad, Reaction: positive, Action: clicks ad > Touchpoint: ad landing page, Reaction: neutral, Action: reviews additional competitor options
It’s important to track each of these points concurrently to understand where customer pain points come from.
Step 3: Break Out Touchpoints and Actions Into Phases

Once you have all of your touchpoints, actions, and reactions listed, put them in a logical order that follows the actual buyer journey. At this point, it can be helpful to break out the list into overall phases in order to get a clearer visualization of the process. Again, these phases can be named whatever makes the most sense for your business. If you want to keep things general, you could follow a specific model, for example, the brand equity pyramid, and use the related phases of “brand salience,” “brand meaning,” “brand response,” and “brand resonance.”
It may be more helpful to name your phases something more specific, however, so you could also structure the map into sections labeled “Discovery,” “Exploration,” “Comparison,” “Conversion,” and “Retention” in order to better represent the customer’s thought processes. Though this step is optional, it’s easier to look at a chart that is broken down into larger phases vs a timeline that just details every specific interaction.
Step 4: Test the Customer Journey Map
Now that you’ve established the basic structure of your map via touchpoints grouped into phases, you should have a few different people run through the map to make sure your model is sound. Put yourself into the shoes of your target persona and pretend you are going through each touchpoint as that type of customer. At each point, stop and ask yourself “What would the customer do next?” The point of this exercise is just to ensure that you’re not leaving out any vital steps in the customer journey and that the map follows a logical progression.
Step 5: Complete the Customer Journey Map with Persona Data
Now that you’ve properly set up your customer journey map and tested it for any missing pieces, all that’s left to do is fill in the persona data. From your persona creation process, you should already have a good understanding of each type’s reasons for interacting with your business and what their specific pain points are. Using customer feedback data, abandoned cart data, advertising data, page bounce rate data, and other sources of customer information, you can reconstruct what the typical buyer’s journey looks like for this segment, including their unique actions and reactions at each step.
Step 6: Identify Areas of Improvement
The main purpose of creating customer journey maps is to display your data in a way that’s easier to visualize than numbers in a spreadsheet. If you’ve displayed your persona data accurately, then it should be simple enough to determine where customers are dropping out of the buyer’s journey. Look for places with negative reaction scores, especially scores that lead to customers bouncing from your site, and identify why this is.
At this point in your analysis, it can be helpful to add a new section to your customer journey map called something like “Pain Points,” “Reaction Explanations,” or simply “Why?” In this section, you can add notes or theories about why those negative reactions are occurring. Sometimes figuring out the issue can be a simple matter of walking through the buyer’s journey yourself (perhaps you discover something like an ad pointing to an unrelated landing page) or running additional customer feedback surveys to gather more data about a particular touchpoint.
Step 7: Create a Corresponding “Business Actions” Map
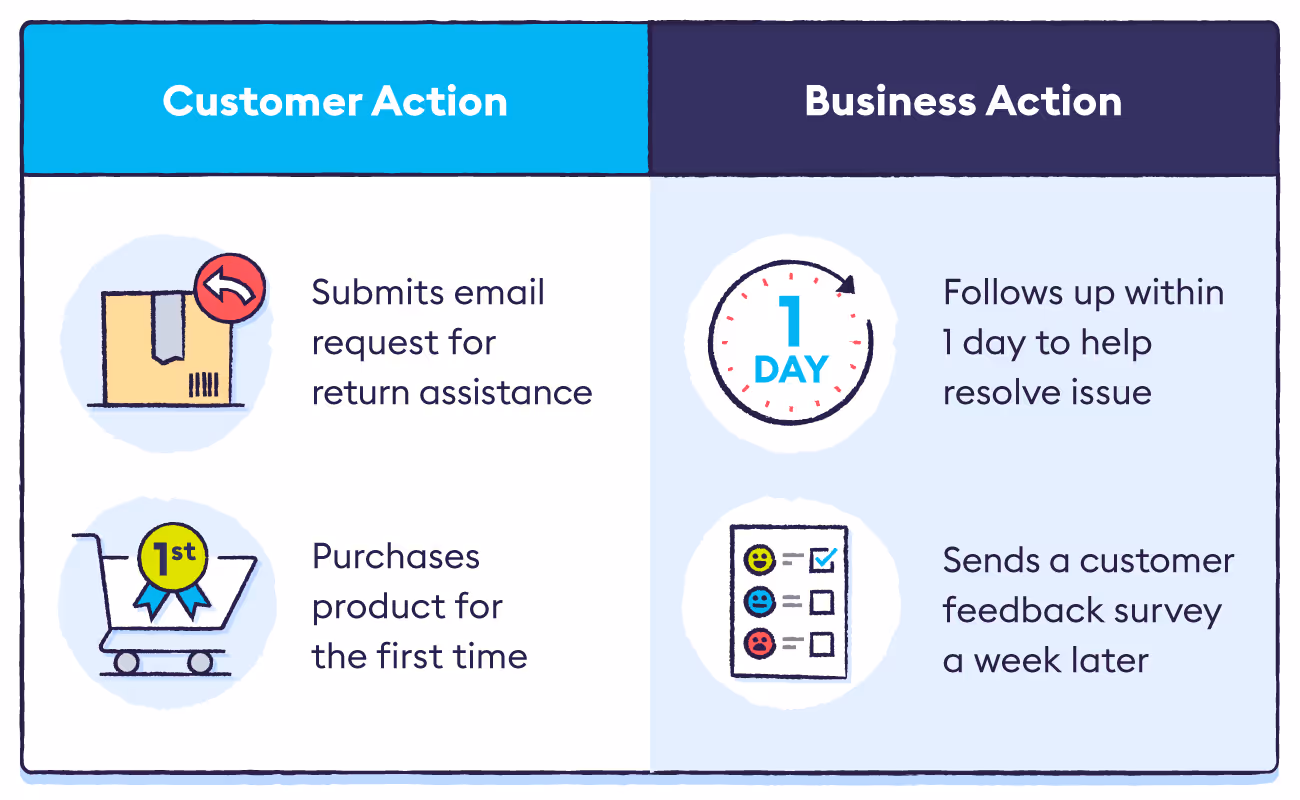
Now that you’ve pinpointed steps on the customer journey that are causing negative reactions, you should be able to identify what your company needs to do to improve these interactions. However, when you aren’t able to determine exactly what is causing these negative reactions, it’s hard to know what to do to fix them. As mentioned, you can always run additional customer feedback surveys to try to shed some light on the issue, but you may be able to discover more immediate fixes by creating a “business actions” map that corresponds to your customer journey map.
While a customer journey map is structured from the customer’s point of view, this reverse map would look at the same touchpoints and actions but from the business’s point of view. For example, if a customer submits a return request, what actions does the returns team take in response? Having each step detailed like this helps you paint a more holistic picture of your business processes to find unexpected areas of customer friction where things may be slipping through the cracks.
Customer Journey Map Examples
Just like customer data in a spreadsheet, there’s only so much you can explain with words on a page. Take a look at the customer journey map examples below to better visualize how these tools can help your business operations.
Hubspot’s simple example helps you understand customer motivations on a basic level, and is most useful for companies without in-depth persona data.

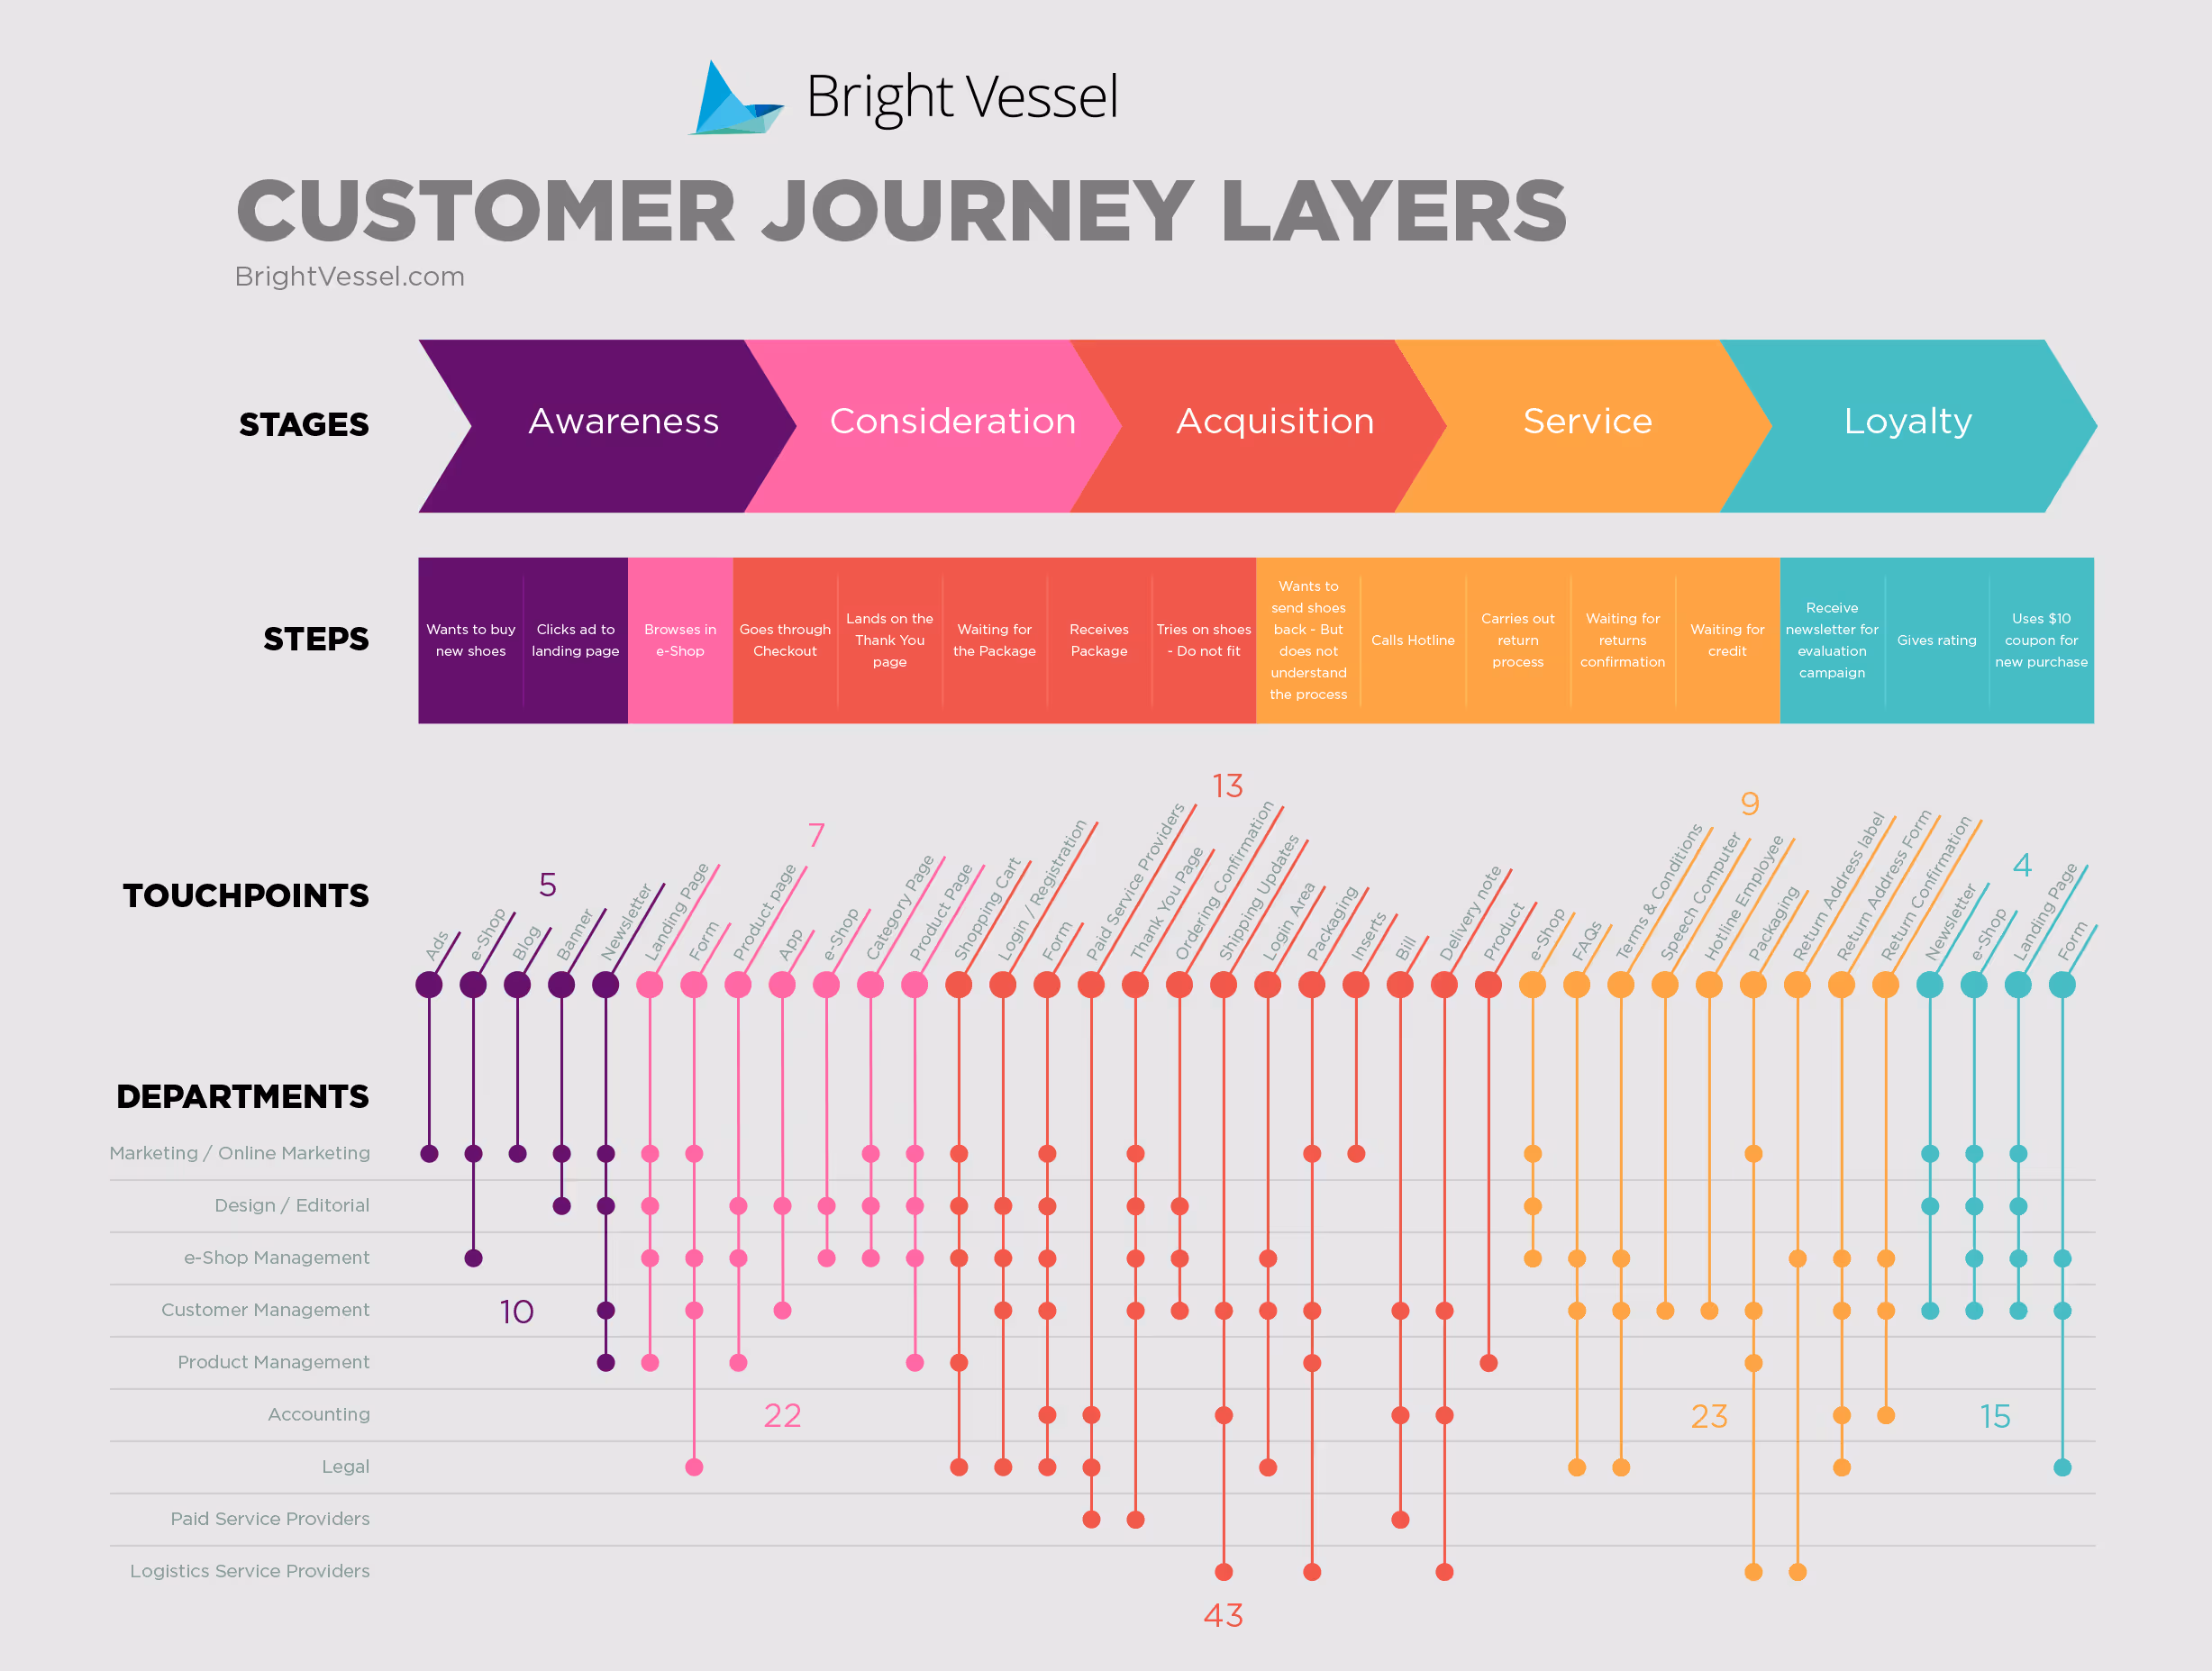
Bright Vessel’s customer journey map is color-coordinated so each department can easily see which touchpoints and actions they are responsible for.
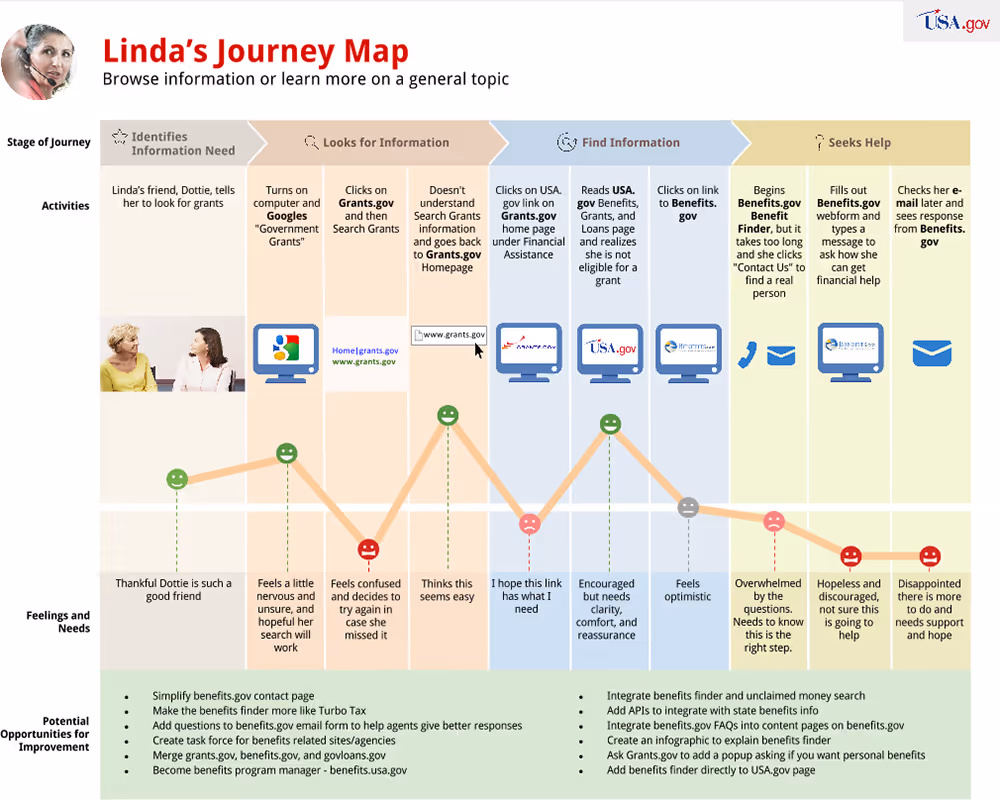
Digital.gov’s example allows for more in-depth customer details, helping you better visualize your personas.
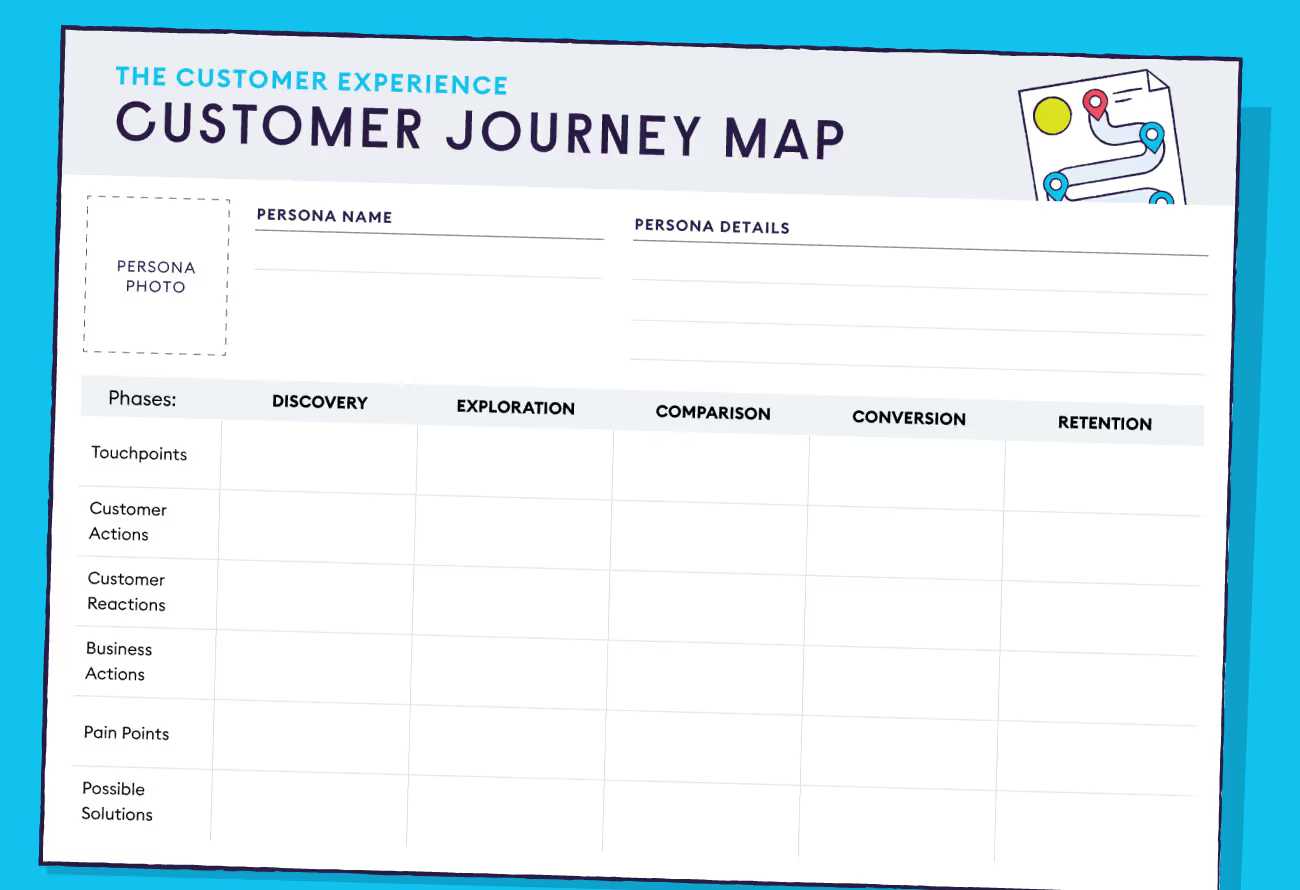
Customer Journey Map Template
Below is a customer journey map template that you can download, edit, and customize to represent your business’s needs.
Customer journey maps are an essential tool for any business looking to learn more about customer pain points on the buyer’s journey. But in order to create these maps, you first need to gather customer data. Chattermill can help you collect, manage, and analyze your customer feedback with our AI-powered software. Contact us to learn more.
Customer Journey Map: FAQs
What is a customer journey map?
A customer journey map is a visual representation of the steps a customer takes when interacting with a brand, from initial awareness through to purchase and post-purchase engagement.
Why is a customer journey map important?
It helps businesses understand customer behaviors, emotions, and pain points at each stage of the journey. This insight allows companies to optimize experiences and remove barriers.
What are the key components of a customer journey map?
Typical components include customer personas, journey stages, customer goals, touchpoints, emotions, and pain points. Together, these elements provide a full picture of the customer experience.
How do you create a customer journey map?
Creating a map involves gathering customer data, identifying personas, defining journey stages, mapping touchpoints, and aligning insights with business goals. Feedback should be used to validate and refine the map.
What are the stages included in a customer journey map?
The stages often include awareness, consideration, purchase, retention, and advocacy. Each stage highlights different customer motivations and needs.
How does a customer journey map improve customer experience?
By identifying where customers face challenges, businesses can implement targeted improvements, personalize communication, and deliver seamless experiences across channels.
What tools can be used to create customer journey maps?
Tools include journey mapping software, feedback analytics platforms, CRM systems, and visualization tools that make it easier to capture and share insights across teams.
How often should customer journey maps be updated?
Journey maps should be updated regularly to reflect changes in customer behavior, market trends, or business strategy. Continuous updates ensure the map remains accurate and useful.


